Friday, November 8, 2013

Candy Corn Learning

       I introduced Claire to candy corn last month and, in an effort to prevent her from devouring the entire bowl in one sitting, decided to use her newfound love to promote a little learning action.  Pretty evil genius of me, but I feel no guilt. 

       First we worked on math skills.  I took a sheet of paper and drew lines to divide it into six boxes.  Next I labeled each box with a number at the top: 0 - 5.  In each box, I drew triangles the size of candy corn.  See where this is going? 

(I would like to note two things about this picture that I love: our awesome chocolate lab in the background forcing himself to not look at the candy he can't have, and how perfectly straight all of her candy corns are.  She took special care to make sure they were just so!) 
 
       Claire loved doing this!  It was a fun way to practice numbers and values.  At first we practiced counting and placing candy corn together, but it didn't take her long to get the idea.  Especially when she realized that after she finished numbers 0-5, she got to eat one piece of candy.  (That was my rule, and she surprisingly stuck to it!  Most of the time...)
 
       While we worked on this, I thought of an easy way to get some practice in with letter sounds, too.  I took another sheet of paper and wrote out the five letters of the month (in the toddler curriculum I made, we focus on five-letter groupings with one vowel in each group).  Then we just played!  I'd ask her to put a candy on the letter that makes the [letter sound] sound, continuing on until all the letters were topped with perfectly straight candy corns.  If you do this, don't forget to include all the sounds for each letter, of course.    
  
      
        Both of these activities are (basically) free, fun, and can be done a few minutes here or there.  All positives in my book.  Happy fall!


Tuesday, November 5, 2013

A Few of My Favorite Things: Part 1

       I will use this page to showcase some of my random favorite things.  Big or small, useful or silly - there is no criteria for my choices other than I love them!  Today I will share three: my daughter's roots map, our rope mirror, and my SurfSET surfboard. 

"Where My Roots Lie"
       First, the map.  I LOVE THIS!  I originally saw this map on Gilt.com and immediately knew I had to have it for our baby girl's nursery.  My husband is from Michigan, I am from North Carolina, my mother is from South Korea, and the rest of our ancestors are from Europe, so I chose the world map.  The company Children Inspire Design also makes U.S. maps and maps of individual states.  The best part?  They come with heart stickers to place over where your roots lie...


Rope Mirror
       My second favorite thing this week is our rope mirror.  Making this was a labor of love!  The first year my husband and I lived together, I bought a large mirror at the thrift store.  For $2, I believe.  Large, plain rectangle with a thin, boring wooden frame.  Not really my style.  Then I saw a photo of a mirror with a thick rope frame and I fell in love.  Because of availability and cost, I used a thin rope bought from the hardware section at the grocery store.  Other supplies included a few clamps and lots and lots of Aveene Original Tacky Glue (my backbone in crafting!).  It took a loooong time because I wanted to be sure the many rows of glued rope were secure before moving on, but when the mirror was done it was all worth it.  It's far from perfect - I like to use the word "rustic" - but much more our style and we love it.  Plus, costs totaled to less than $20.  Bonus! 


SurfSET
       The last thing I'll share for now is a fun one - my surfboard!  Living at the beach, I felt like almost all of my friends surfed or at least gave it a go.  I always said I wanted to learn, which was true, but at the end of the day I had to admit... I'm afraid of waves.  A bit of a problem if you want to surf, I'm pretty sure...
 
       Fast forward to last spring.  I enjoy planning my strength training workouts and am always looking for ideas to mix things up.  I was doing research online for surf-style exercises and wasn't finding anything new, and then I saw it.  A new, growing company called SurfSET.  A surfboard sitting on three small air-filled balls, making a completely unstable surface (3 settings) to do a variety of workouts: surf specific, strength, yoga, abs, cardio... whatever-you-can-do-without-falling-off is fair game, in my opinion.  It was everything I've been wanting for such a long time!  SurfSET is to surfing like spinning is to biking.  As close as you can get to the real thing without really doing the real thing.  I immediately became obsessed with trying this board.  Unfortunately, there were no gyms or trainers within a few hours of me, so I begged and pleaded and waited until my wonderful, smart, considerate, supportive husband was on board (pun intended) and ordered my own.  It's a great full-body workout.  Give it a try!    


Thanks for reading!  Until next time :-)

Friday, November 1, 2013

Season & Clothing Cards

       The second weather activity I made this fall is a set of season and clothing matching cards.  I've loved this idea ever since my first time in a Montessori classroom and it's an easy one to do at home with your own kids.  (Hypothetically... the cards are easy, but I suppose it would depend more on your child's toddler-terror level that day!) 

       While I was looking for photos to use on my cards, I came across these free printables from Montessori for Everyone.  You can't beat free printables!  Unless someone just gave you free cards... but in any case, if you have a small laminating machine at home (which I highly recommend if you like DIY activities), making various learning cards has never been easier. 

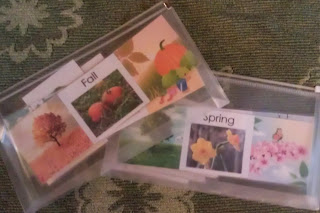
       The clothing cards in the photos below are from Montessori for Everyone.  The season heading cards are just three pictures I glued onto cardstock before laminating.  The center picture is the one included with the free printables, but I wanted to show more of each season and searched for two extra pictures to supplement.  For each season I found a tree to add, as well as a cartoon drawing.  I like the way they turned out!    

 
       My daughter enjoys these cards and I think it's good that the pictures are real photos, not cartoons.  Even though she doesn't sort these independently yet, it's a great opportunity to look through the different pictures and talk about the seasons and weather.  ***Each season/clothing set is labeled with numbers on the back, so that as Claire gets older she will be able to self-check.  (Ex: Winter = 1, Spring = 2, Summer = 3, Fall = 4) 

 
       I store these cards in two clear zipper pouches: winter and spring together, fall and summer together.  One reason I divided them was because my daughter is only 2 and we never spend more than several minutes at a time on this before she loses interest.  The other reason is because clothing in the fall/winter can be similar and clothing in the summer/spring can be similar.  I wanted to divide up the cooler seasons and the warmer seasons to help eliminate any initial confusion for Claire... now if she sees a sweater, she won't have to decide if it's in fall or winter but rather winter or spring.    


        We've enjoyed these cards so far, though I plan on adding different clothing photos to personalize it a little more for Claire.  For example, she has never worn a life jacket (out of lack of necessity, not because we're awful, reckless parents!), but I want to add a picture of a sundress or tank top to the summer set.  Unfortunately, I'm currently out of computer ink and have lazily not bought a new one yet... I'm sure I'll get to it one of these days!